Bloodbane
Well-known member
I still have draft for these but I don't feel like about splitting into single threads so I just post them here.
Generic Portal

Intro: Generic Portal is advanced version of Alternate Portal above. They work exactly the same. The only difference is that Generic Portal allows modder to set different branch in level texts without making another portal.
This tutorial will describe how to modify alternate portal to make generic portal.
Procedure: 1st, here's example of alternate portal:
Now modify it into this:
As you can see, the script in FOLLOW1 is changed while the rest remains the same. What this script do is acquire this portal's alias then in 2nd frame, jumps to branch with that alias.
See above picture. This is example of how to set it in a level:
With this, you only need one portal entity to set 6 branches. Efficient, don't you think?")
Limitation: The issue is exactly same as alternate portal's so I only mention its limitation. The most obvious limitation is that generic portal uses specific image (or nothing if you use blank image) and specific portal size. So it's recommended to set generic image and size so the portal can be used almost anywhere.
Level End Entity
Intro: Normally levels in OpenBoR are ended by defeating every enemy in the level or by defeating boss. Alternatively, touching endlevel entity also ends level. With script, level can be ended in various ways. This tutorial describes how to make entity which ends current level after it is spawned. In addition to ending level, this entity also brings player to defined branch.
Procedure: Let's name this entity as LevelEnd. Here's an example of its text:
LevelEnd uses 'antigravity 100' to prevent it from falling to holes. Its type doesn't matter, let's just use 'type none'.
In its IDLE, it has script which works like this: entity's alias is acquired then at 2nd frame, level is ended and jumps to branch with same name as that alias. If there's no such branch, the level only ends without jumping to any branch.
'delay 300' means after LevelEnd is spawned, it will wait 300 centiseconds or 3 seconds before ending the level. Change the value to suit your need.
It is using blank image (empty.gif) cause it's meant to be invisible.
To use LevelEnd, either spawn it directly like this:
or set it as other entity's dropped item like this:
Alias is only added if you want LevelEnd to jump to defined branchbame after ending the level.
Limitation: Since this entity uses its name as branch destination, it will try to jump to branch named 'LevelEnd' if no alias is given to it. That means, you can't use 'LevelEnd' as name of your branches to avoid conflict with LevelEnd (why would you anyways ?).
Alternate Default Palette
Intro: Ever have problem in which entity's colors look awful but you are too lazy to edit all sprites? or you want to use remap as default palette but are too lazy to change sprites' palette? Now your problem is solved with this tutorial.
Before we start, this method ONLY works with 16bit/32bit colour depth.
Procedure: In 16bit/32bit colour depth, OpenBoR gets entity's palette from reference image which is either 1st defined image or image defined by palette command. This palette is used for all images/sprites by that entity.
Because of that nature, if the reference image's palette is altered, the whole images' palette will be altered too. So in order to change shown colors, all we need to do is to change the reference image's palette.
If your problem is entity's colors look awful, just find reference image and edit its palette. OTOH if you want to use a remap as default palette, just change reference image to something like this:
alter.png is the remap and it will be default palette for the entity.
Limitation: Just to reiterate, this method ONLY change SHOWN colors in game. It doesn't change the images palette at all.
Simple Striker
Intro: In Capcom beat'm ups, ever notice enemies which comes, attack then leaves? There is no official term for them so I use striker term cause they act just like King of Fighter's strikers.
This tutorial desribes how to make such striker. However, since striker is not 100% stable, this tutorial will only desribe simple striker which is stable enough.The instability issues will be explained in detail in Issue below.
One thing to mention is that strikers are optional enemies. Players could kill them or just let them go. When they are let go, 'offscreenkill' command will remove them when they are offscreen far enough. That's why you have to make sure to use latest OpenBoR version cause that command is not supported in old version.
Procedure: As mentioned before, striker comes, attack then leaves so that means the striker needs SPAWN animation for the coming in animation. For the attack animation, it can be added after the coming animation in SPAWN or in seperate ATTACK animation. Here's an example for the latter:
This striker is simple cause it only has 1 HP which means it will die if hit by any attack. It will also play DEATH when killed because of 'death 1'. Animations such as PAIN, FALL and RISE aren't required.
'cantgrab 1' is set to prevent players from grabbing this enemy.
'nomove 1 1' is set to make striker just perform the attack and won't try to walk at all.
'candamage' is set to player and obstacle. The former is obvious, the latter is so striker will also destroy obstacles if it meets any.
'offscreenkill' is important. It is required to make the striker disappear after going offscreen. 100 is chosen so striker will immediately disappear when it is 100 pixels offscreen, left or right. That also means this striker should be spawned less than 100 pixels offscreen to avoid being removed right after being spawned.
About the animations, SPAWN animation holds animation when striker comes. It will stop after animation ends. Then it has ATTACK1 which has wide and long coverage. The idea is so striker always find player and attack after coming in. Well, if there are no player, it will just stay still but it's good thing cause there's no need to attack when there's nothing to hit right?.
In ATTACK1, there's 'jumpframe' which moves striker forward. The animation is looped also which make striker moves continuously to other screen edge. After it goes beyond offscreenkill value, it will disappear.
Here's an example to spawn striker:
Notice that both striker are spawned 50 pixels offscreen. Don't forget to set 'flip' properly so they enter the screen instead of going out.
That's one way to make simple striker. Striker can do anything after coming but make sure it goes offscreen cause players can't be forced to kill striker.
Expansion: There are lots of way to expand the striker but you might need to use script to perfecten the striker. These are couple possible expansions:
1. Instead of charging forward, the striker could shoot or toss projectile in ATTACK1. After shooting or tossing, it could move away offscreen to leave. Combine 'loop' with 'jumpframe' for the leaving effect.
2. Strikers could act just as item carriers. They don't need to have attackbox (nothing wrong if they have though).
3. Strikers could be living time bomb. These type don't need offscreenkill but lifespan instead. Add explosion in DEATH animation and they are set!
4. Alternate ATTACK animation could be added to give alternate attack for the striker making it less predictable.
Aside of using ATTACK animation, striker could just use SPAWN animation for the come, attack then leave actions.
If you want to make striker which leaves from where it comes, you might need script to make sure they go to the right way after attacking. FYI enemy automatically turns if player is behind him/her that's why script is required.
Issue: The simple striker above is actually not 100% stable.
Here are couple instability issues, most of them are about ensuring striker's leave:
1. Striker might be blocked by wall and stuck. Although, it can be solved by making striker ignores walls, it is best to avoid spawning them toward walls.
2. Striker might be blocked by obstacles. The obstacles HP could be set low to help them charging though but it's best to avoide spawning them toward obstacles. OTOH some obstacles such as gate shouldn't be destroyed by them.
3. Strikers which can be grabbed can be done, just don't use 'cantgrab'. However, by allowing these, their position might change cause players could move them (with grabmove or throw) and let them go. They might bump to walls or obstacles later.
4. Strikers with higher HP is possible but make sure they have leave screen animation. This could be set in RISE or just ATTACK animation with wide range like above.
Generic Portal
Intro: Generic Portal is advanced version of Alternate Portal above. They work exactly the same. The only difference is that Generic Portal allows modder to set different branch in level texts without making another portal.
This tutorial will describe how to modify alternate portal to make generic portal.
Procedure: 1st, here's example of alternate portal:
name Portal
nomove 1
type none
nolife 1
score 0 -1
antigravity 100
candamage player
setlayer 100
anim idle
loop 1
delay 50
followanim 1
followcond 1
offset 13 27
attack 1 2 32 26 0 0 1 1
noreflect 1
hitfx data/sounds/silent.wav
frame data/chars/misc/arrowr.png
frame data/chars/misc/empty.gif
anim follow1
delay 50
offset 13 27
frame data/chars/misc/arrowr.png
@cmd jumptobranch "Branch1" 1
frame data/chars/misc/empty.gif
frame data/chars/misc/arrowr.png
Now modify it into this:
name Portal
nomove 1
type none
nolife 1
score 0 -1
antigravity 100
candamage player
setlayer 100
anim idle
loop 1
delay 50
followanim 1
followcond 1
offset 13 27
attack 1 2 32 26 0 0 1 1
noreflect 1
hitfx data/sounds/silent.wav
frame data/chars/misc/arrowr.png
frame data/chars/misc/empty.gif
anim follow1
@script
void self = getlocalvar("self");
char Name = getentityproperty(self,"name");
if(frame == 1){
jumptobranch(Name, 1);
}
@end_script
delay 50
offset 13 27
frame data/chars/misc/arrowr.png
frame data/chars/misc/empty.gif
frame data/chars/misc/arrowr.png
As you can see, the script in FOLLOW1 is changed while the rest remains the same. What this script do is acquire this portal's alias then in 2nd frame, jumps to branch with that alias.
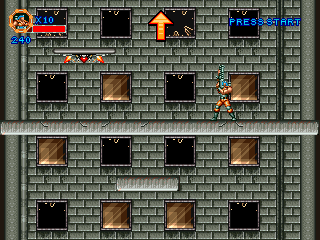
See above picture. This is example of how to set it in a level:
spawn Portal
alias T1
coords 30 222 130
at 0
spawn Portal
alias T2
flip 1
coords 290 222 130
at 0
spawn Portal
alias T3
coords 30 222 70
at 0
spawn Portal
alias T4
flip 1
coords 290 222 70
at 0
spawn Portal
alias T5
coords 30 222 10
at 0
spawn Portal
alias T6
flip 1
coords 290 222 10
at 0
With this, you only need one portal entity to set 6 branches. Efficient, don't you think?
Limitation: The issue is exactly same as alternate portal's so I only mention its limitation. The most obvious limitation is that generic portal uses specific image (or nothing if you use blank image) and specific portal size. So it's recommended to set generic image and size so the portal can be used almost anywhere.
Level End Entity
Intro: Normally levels in OpenBoR are ended by defeating every enemy in the level or by defeating boss. Alternatively, touching endlevel entity also ends level. With script, level can be ended in various ways. This tutorial describes how to make entity which ends current level after it is spawned. In addition to ending level, this entity also brings player to defined branch.
Procedure: Let's name this entity as LevelEnd. Here's an example of its text:
name LevelEnd
type none
antigravity 100
anim idle
@script
void self = getlocalvar("self");
char Name = getentityproperty(self,"name");
if(frame == 1){
jumptobranch(Name, 1);
}
@end_script
delay 300 #<--- defines how long it takes before level ends
offset 1 1
frame data/chars/misc/empty.gif
frame data/chars/misc/empty.gif
LevelEnd uses 'antigravity 100' to prevent it from falling to holes. Its type doesn't matter, let's just use 'type none'.
In its IDLE, it has script which works like this: entity's alias is acquired then at 2nd frame, level is ended and jumps to branch with same name as that alias. If there's no such branch, the level only ends without jumping to any branch.
'delay 300' means after LevelEnd is spawned, it will wait 300 centiseconds or 3 seconds before ending the level. Change the value to suit your need.
It is using blank image (empty.gif) cause it's meant to be invisible.
To use LevelEnd, either spawn it directly like this:
spawn LevelEnd
alias BranchName
coords 160 200
at 0
or set it as other entity's dropped item like this:
spawn Enemy
item LevelEnd
itemalias BranchName
coords -100 200
at 0
Alias is only added if you want LevelEnd to jump to defined branchbame after ending the level.
Limitation: Since this entity uses its name as branch destination, it will try to jump to branch named 'LevelEnd' if no alias is given to it. That means, you can't use 'LevelEnd' as name of your branches to avoid conflict with LevelEnd (why would you anyways
?).Alternate Default Palette
Intro: Ever have problem in which entity's colors look awful but you are too lazy to edit all sprites? or you want to use remap as default palette but are too lazy to change sprites' palette? Now your problem is solved with this tutorial.
Before we start, this method ONLY works with 16bit/32bit colour depth.
Procedure: In 16bit/32bit colour depth, OpenBoR gets entity's palette from reference image which is either 1st defined image or image defined by palette command. This palette is used for all images/sprites by that entity.
Because of that nature, if the reference image's palette is altered, the whole images' palette will be altered too. So in order to change shown colors, all we need to do is to change the reference image's palette.
If your problem is entity's colors look awful, just find reference image and edit its palette. OTOH if you want to use a remap as default palette, just change reference image to something like this:
palette data/chars/entity/alter.png
alter.png is the remap and it will be default palette for the entity.
Limitation: Just to reiterate, this method ONLY change SHOWN colors in game. It doesn't change the images palette at all.
Simple Striker
Intro: In Capcom beat'm ups, ever notice enemies which comes, attack then leaves? There is no official term for them so I use striker term cause they act just like King of Fighter's strikers.
This tutorial desribes how to make such striker. However, since striker is not 100% stable, this tutorial will only desribe simple striker which is stable enough.The instability issues will be explained in detail in Issue below.
One thing to mention is that strikers are optional enemies. Players could kill them or just let them go. When they are let go, 'offscreenkill' command will remove them when they are offscreen far enough. That's why you have to make sure to use latest OpenBoR version cause that command is not supported in old version.
Procedure: As mentioned before, striker comes, attack then leaves so that means the striker needs SPAWN animation for the coming in animation. For the attack animation, it can be added after the coming animation in SPAWN or in seperate ATTACK animation. Here's an example for the latter:
name FlyOctiS
health 1
nomove 1 1
type enemy
death 1
cantgrab 1
candamage player obstacle
offscreenkill 100
anim spawn
delay 10
offset 44 90
jumpframe 1 0 1 0
frame data/chars/enemy/idle1.png
frame data/chars/enemy/idle2.png
bbox 12 18 68 63
frame data/chars/enemy/idle3.png
frame data/chars/enemy/idle1.png
frame data/chars/enemy/idle2.png
frame data/chars/enemy/idle3.png
frame data/chars/enemy/idle1.png
frame data/chars/enemy/idle2.png
frame data/chars/enemy/idle3.png
frame data/chars/enemy/idle1.png
frame data/chars/enemy/idle2.png
anim idle
loop 1
delay 10
offset 44 90
bbox 12 18 68 63
frame data/chars/enemy/idle1.png
frame data/chars/enemy/idle2.png
frame data/chars/enemy/idle3.png
anim attack1
loop 1
range 0 400
rangez -200 200
delay 20
offset 44 90
jumpframe 0 0 2 0
bbox 12 18 68 63
attack 41 17 44 67 10 1
frame data/chars/enemy/attack.png
anim death
delay 200
offset 44 90
jumpframe 0 3 -2 0
landframe 1
frame data/chars/enemy/fall1.png
delay 100
frame data/chars/enemy/dead.png
'cantgrab 1' is set to prevent players from grabbing this enemy.
'nomove 1 1' is set to make striker just perform the attack and won't try to walk at all.
'candamage' is set to player and obstacle. The former is obvious, the latter is so striker will also destroy obstacles if it meets any.
'offscreenkill' is important. It is required to make the striker disappear after going offscreen. 100 is chosen so striker will immediately disappear when it is 100 pixels offscreen, left or right. That also means this striker should be spawned less than 100 pixels offscreen to avoid being removed right after being spawned.
About the animations, SPAWN animation holds animation when striker comes. It will stop after animation ends. Then it has ATTACK1 which has wide and long coverage. The idea is so striker always find player and attack after coming in. Well, if there are no player, it will just stay still but it's good thing cause there's no need to attack when there's nothing to hit right?
.In ATTACK1, there's 'jumpframe' which moves striker forward. The animation is looped also which make striker moves continuously to other screen edge. After it goes beyond offscreenkill value, it will disappear.
Here's an example to spawn striker:
spawn flyoctiS
map 2
coords 370 190
at 100
spawn flyoctiS
map 2
flip 1
coords -50 210
at 100
Notice that both striker are spawned 50 pixels offscreen. Don't forget to set 'flip' properly so they enter the screen instead of going out.
That's one way to make simple striker. Striker can do anything after coming but make sure it goes offscreen cause players can't be forced to kill striker.
Expansion: There are lots of way to expand the striker but you might need to use script to perfecten the striker. These are couple possible expansions:
1. Instead of charging forward, the striker could shoot or toss projectile in ATTACK1. After shooting or tossing, it could move away offscreen to leave. Combine 'loop' with 'jumpframe' for the leaving effect.
2. Strikers could act just as item carriers. They don't need to have attackbox (nothing wrong if they have though).
3. Strikers could be living time bomb. These type don't need offscreenkill but lifespan instead. Add explosion in DEATH animation and they are set!
4. Alternate ATTACK animation could be added to give alternate attack for the striker making it less predictable.
Aside of using ATTACK animation, striker could just use SPAWN animation for the come, attack then leave actions.
If you want to make striker which leaves from where it comes, you might need script to make sure they go to the right way after attacking. FYI enemy automatically turns if player is behind him/her that's why script is required.
Issue: The simple striker above is actually not 100% stable.
Here are couple instability issues, most of them are about ensuring striker's leave:
1. Striker might be blocked by wall and stuck. Although, it can be solved by making striker ignores walls, it is best to avoid spawning them toward walls.
2. Striker might be blocked by obstacles. The obstacles HP could be set low to help them charging though but it's best to avoide spawning them toward obstacles. OTOH some obstacles such as gate shouldn't be destroyed by them.
3. Strikers which can be grabbed can be done, just don't use 'cantgrab'. However, by allowing these, their position might change cause players could move them (with grabmove or throw) and let them go. They might bump to walls or obstacles later.
4. Strikers with higher HP is possible but make sure they have leave screen animation. This could be set in RISE or just ATTACK animation with wide range like above.


")