You are using an out of date browser. It may not display this or other websites correctly.
You should upgrade or use an alternative browser.
You should upgrade or use an alternative browser.
ChronoCrash Modders Tools 0.7.8
No permission to download
- Thread starter Piccolo
- Start date
Piccolo
Well-known member
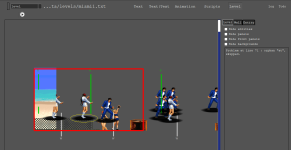
Ok, then if you can send me the txt level file with the images files (for the panel, background, and so on), I can look into itOh yeah, there was a lose "know" on the models.txt - now the warning is gone
View attachment 5318
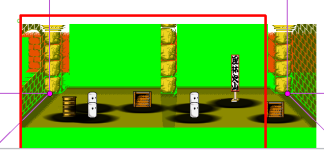
About the transparency, I've checked the "force..." and restarted, but no good:
View attachment 5319
maxman
Well-known member
Hi, Piccolo. I haven't downloaded the latest update yet, but I received this error message here when I was dragging a few sprites to the animation tab.
Code:
Traceback (most recent call last):
  File "data\__init__.py", line 566, in getLines
  File "encodings\cp1252.py", line 23, in decode
UnicodeDecodeError: 'charmap' codec can't decode byte 0x8f in position 83: character maps to <undefined>

During handling of the above exception, another exception occurred:

Traceback (most recent call last):
  File "\\VBoxSvr\Partage\openbor-utils\cmt.py", line 240, in dropEvent
  File "gui\main\__init__.py", line 158, in openFile
  File "gui\main\fileselector.py", line 98, in loadFromDisk
  File "data\__init__.py", line 576, in getLines
  File "encodings\cp1252.py", line 23, in decode
UnicodeDecodeError: 'charmap' codec can't decode byte 0x8f in position 83: character maps to <undefined>Piccolo
Well-known member
Hi maxman, I will take a look at this next timeHi, Piccolo. I haven't downloaded the latest update yet, but I received this error message here when I was dragging a few sprites to the animation tab.
Code:Traceback (most recent call last): File "data\__init__.py", line 566, in getLines File "encodings\cp1252.py", line 23, in decode UnicodeDecodeError: 'charmap' codec can't decode byte 0x8f in position 83: character maps to <undefined> During handling of the above exception, another exception occurred: Traceback (most recent call last): File "\\VBoxSvr\Partage\openbor-utils\cmt.py", line 240, in dropEvent File "gui\main\__init__.py", line 158, in openFile File "gui\main\fileselector.py", line 98, in loadFromDisk File "data\__init__.py", line 576, in getLines File "encodings\cp1252.py", line 23, in decode UnicodeDecodeError: 'charmap' codec can't decode byte 0x8f in position 83: character maps to <undefined>
Piccolo
Well-known member
Piccolo updated Chronocrash Modders Tools with a new update entry:
Changelog 0.4.6
Read the rest of this update entry...
Changelog 0.4.6
Added a little tool "Check paths" in "Tools -> Tool Dialog -> Check paths".
Basically this tool will parse every entity and level file, and let you know which paths (strings starting with "data/", could be parameters for frame, palette, icon, alternatepal, and so on) doesn't correspond to a real file.
Useful to detect "missing" files. @O Ilusionista
Read the rest of this update entry...
O Ilusionista
Captain 100K
@Piccolo really thanks for taking my suggestion into consideration. The file checking tool is a life saver!
Sadly, OpenBOR has a serious issue with missing files: if you point to a non existent image as a frame, the engine will report it on the log and close, that is okay.
But if you point a missing file as a palette, the engine does a silent crash - in other words, the engine just close without any info on the log.
I hope the devs could fix this, because it's very important and can affect the user experience with the engine.
Edit: I already tested the tool and its great! Really thanks buddy.
Last edited:
O Ilusionista
Captain 100K
Piccolo
Well-known member
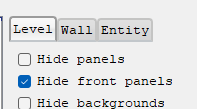
Sure, thought it was already there for some reason. Will upload a minor update with this feature within the hour.Hye @Piccolo , I wanna suggest something: It is possible to add another option here - "hide entities"?
View attachment 5367
Sometimes, its hard to grab walls and move them when you have many enemies on the screen. And hiding one by one doesn't help too much
Piccolo
Well-known member
Piccolo updated Chronocrash Modders Tools with a new update entry:
Changelog 0.4.6.1
Read the rest of this update entry...
Changelog 0.4.6.1
Level Editor : added a checkbox to hide/show all entities
Read the rest of this update entry...
Piccolo
Well-known member
Hi !Hi there!
Is there a video tutorial out on this?
Not that I am aware of. I don't think I have done any. But maybe some users have.
Anyway you can quite easily pick up the core features with a trial and error approach.
Some specific features would benefit from a tutorial, though.
Grit
Well-known member
The trail and error is the story of my life!Anyway you can quite easily pick up the core features with a trial and error approach.
I'm finally making progress thanks to the peolple and applications found here though!
It would of been impossible otherwise.
So thanks!
I been using openborstats but I can see the appeal of what your application offer!
The level editor though is something else...drag and drop is a god send!
Saves a person so much time and is convenient too.
Is it possible to select and play multiple animations after each other?
eg: attack1,attack2,attack3 and so on just to see a combo sting in motion...
With regards to levels could Map be added to the entity?
Eg:
Map 0
X:
Z:
altitude
at:
Perhaps Set Platform could use a brief overview.Some specific features would benefit from a tutorial, though.
I got entities down but would love to get a better understanding of levels!
When I say down I mean the bare minimum.
Is there is a way to test out entities and levels without leaving CMT?
I usually reload the game and go back and forth but it doesn't always work.
Great work on CMT and keep well.
Last edited:
O Ilusionista
Captain 100K
@Piccolo hey buddy, I was using this tool on my last live and I had an idea: it's possible to have the program to display only certain types of entities on a level?
For example, a drop down menu or something like that which let you choose the types you want to see on the I've preview.
If it's too difficult, at least an option to display only obstacles? An idea would be to add another checkbox "hide obstacles". With this, the other box 'hide entities" won't hide it and you would have to check this one to hide the obstacles.
This could be very useful for placing obstacles on the level.
maxman
Well-known member
Could you add an option for the level setting that allows displaying entity shadows every time any entity appears? It's just to see whether you want the shadows to display or not. Also, how about adding a white small dot as a shadow as a level coord or offset as a spawned entity?
When using 'at' in conjunction with either music or light in levels, the error box keeps saying, like, at is an "orphan" while skipped.
It seems normal to use music and light with at in levels.
You can add updateframe under the spawn script in levels like you added changeentityproperty or performattack.
When using 'at' in conjunction with either music or light in levels, the error box keeps saying, like, at is an "orphan" while skipped.
Code:
Problem at line 27 : orphan "at", skipped.It seems normal to use music and light with at in levels.
Code:
music    data/music/ryu.ogg
at    110
Code:
light    -256 -128
at    0
You can add updateframe under the spawn script in levels like you added changeentityproperty or performattack.
Code:
spawn ramayana 1 # Applause
@script
void main(){
    void self = getlocalvar("self");
    updateframe(self, 3); // Applauding
    changeentityproperty(self, "position", 164, 140, 0);
}
@end_script
coords 164 140
at 0

spawn ramayana 1 #Encouraging
@script
void main(){
    updateframe(getlocalvar("self"), 6);
}
@end_script
coords 193 139
at 0

spawn ramayana 1 # Waving arms
@script
void main(){
    updateframe(getlocalvar("self"), 9); // Waving arms
}
@end_script
coords 449 134
at 0
Code:
name Ramayana
type none
#scroll 0.3
facing 1
speed 0
subject_to_minz 0
antigravity 100
palette none
animationscript data/scripts/script.c

anim idle

loop 1
offset 1 1
delay 20
frame data/bgs/m._bison/mbison.pcx00040000.png # 0
frame data/bgs/m._bison/mbison.pcx00040001.png # 1
@cmd aniframe "ANI_IDLE" 0
frame data/bgs/m._bison/mbison.pcx00040001.png # 2
delay 30
offset 4 1
frame data/bgs/m._bison/mbison.pcx00050000.png # 3
offset 1 1
frame data/bgs/m._bison/mbison.pcx00050001.png # 4
@cmd aniframe "ANI_IDLE" 3
frame data/bgs/m._bison/mbison.pcx00050001.png # 5
offset 1 1
delay 24
frame data/bgs/m._bison/mbison.pcx00060000.png # 6
frame data/bgs/m._bison/mbison.pcx00060001.png # 7
@cmd aniframe "ANI_IDLE" 6
frame data/bgs/m._bison/mbison.pcx00060001.png # 8
offset 1 0
delay 32
frame data/bgs/m._bison/mbison.pcx00070000.png # 9
offset 1 4
frame data/bgs/m._bison/mbison.pcx00070001.png # 10
offset 2 4
frame data/bgs/m._bison/mbison.pcx00070002.png # 11
offset 1 4
frame data/bgs/m._bison/mbison.pcx00070001.png # 12
@cmd aniframe "ANI_IDLE" 9
frame data/bgs/m._bison/mbison.pcx00070002.png # 13
offset 1 191
frame data/bgs/m._bison/mbison.pcx00080000.png # 14
@cmd aniframe "ANI_IDLE" 14
frame data/bgs/m._bison/mbison.pcx00080000.png # 15
offset 1 1
frame data/bgs/m._bison/mbison.pcx00030000.png # 16
@cmd aniframe "ANI_IDLE" 16
frame data/bgs/m._bison/mbison.pcx00030000.png
Piccolo
Well-known member
Right now, no but I could relatively easily add such feature. The main difficulty would be to implement smooth cancelling, as chained animations rarely play fully one after another.Is it possible to select and play multiple animations after each other?
eg: attack1,attack2,attack3 and so on just to see a combo sting in motion...
In that regard it would probably be easier to add some kind of entity simulation, where you control the entity and press buttons, and the animations chains as if you were in the engine.
To ajust the color ? Probably yes.With regards to levels could Map be added to the entity?
Eg:
Not as in the engine obviously. It would basically require me to recreate the engine within CMT.Is there is a way to test out entities and levels without leaving CMT?
I usually reload the game and go back and forth but it doesn't always work.
But in the future I might add some features to simulate the core feature of going through a level.
It will never replace in-engine testing though.
Piccolo
Well-known member
Hey, both features should be easy to implement, I'll look into it soon.@Piccolo hey buddy, I was using this tool on my last live and I had an idea: it's possible to have the program to display only certain types of entities on a level?
For example, a drop down menu or something like that which let you choose the types you want to see on the I've preview.
If it's too difficult, at least an option to display only obstacles? An idea would be to add another checkbox "hide obstacles". With this, the other box 'hide entities" won't hide it and you would have to check this one to hide the obstacles.
This could be very useful for placing obstacles on the level.
Piccolo
Well-known member
Yes thanks for the suggestions.
Can you clarify the first suggestion though ? That one :
Right now entities have a shadow spot under them in the level editor. What exactly do you want more/less relative to that ?Could you add an option for the level setting that allows displaying entity shadows every time any entity appears? It's just to see whether you want the shadows to display or not.
(I understood the part about the white dot)
maxman
Well-known member
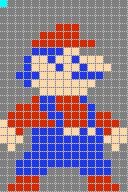
Similar to Hide Entities, I was asking about an option for the shadow itself for hiding from a spawned entity, leaving probably the white dot for it (the shadow) or not (no white dot). It's for dragging the sprite of the certain spawned entity to where it's going to be placed at. Maybe leaving the white dot as the spawned entity's position point would be better to look, if you don't like shadows around because... what if you'll place an offset point on the character's head or behind it, especially you don't have to place it around the characters' feet? Look at this example here when you place an offset to 0 0 with a cyan color at the top-left corner. If I place offset above Mario, for example, the shadow would spawn over his head in the level editor.Can you clarify the first suggestion though ? That one :
Right now entities have a shadow spot under them in the level editor. What exactly do you want more/less relative to that ?

Spawn point if it's offset 0 0 or whatever. Look at the yellow circle here. It's a coords point and a spawn point or character offset. You don't have to remove the shadow. Just disable/enable it from showing/hiding it or place a white dot there. Otherwise, a white cross or X mark would be okay for it level coords position.

Am I clear or not?
Piccolo
Well-known member
Oh ok, yes now that's clear. The code is basically already in place for that, so it will be easy.
maxman
Well-known member
Oh. And what about the number of panels in order, like, a, b, c, etc.? I only see A being visibly set as the only panel order like you see in the classic/original Beats of Rage game. Also, I forgot that it accepts more than one frontpanel.
Could you have those same panels appear according to the letter being set in order?

Code:
# Front layer
frontpanel    data/bgs/street/f00.gif
frontpanel    data/bgs/street/f01.gif
frontpanel    data/bgs/street/f02.gif
frontpanel    data/bgs/street/f03.gif

# Load 'panels'. Up to 26 panels can be loaded.
# They can be referenced using A-Z
# Specify normal, neon and screen, or 'none'
panel        data/bgs/street/n01.gif    data/bgs/street/neon01.gif    data/bgs/street/s01.gif
panel        data/bgs/street/n02.gif    data/bgs/street/neon02.gif    data/bgs/street/s02.gif
panel        data/bgs/street/n03.gif    none                none
panel        data/bgs/street/n04.gif    none                none
panel        data/bgs/street/n05.gif    none                data/bgs/street/s05
panel        data/bgs/street/n06.gif    none                none
panel        data/bgs/street/n07.gif    none                none
panel        data/bgs/street/n05.gif    data/bgs/street/clubk        data/bgs/street/s05

# ab = Pinepot left
# c = wall, ridge left
# d = wall, ridge right + 078
# e = window
# f = door
# g = wall
# h = Club K neon


# Set the order (don't make the lines too long)
# Syntax:
#    order    [a...z]        (a sequence of panels, e.g. abcdefghij)
#    order    [a...z]
#
order    fdefecdhfecggdabcd
order    fdefecdhfecggdab
panel {norm} {neon} {scrn}
- {norm}, {neon}, and {scrn} are paths which point to the normal, neon, and screen graphics for a panel. {neon} and {scrn} are optional fields. If you aren't using them, put the word 'none' in their place.
- Just like any image used by OpenBoR, panels must use paletted images. In 8 bit colourdepth (default), it must use same palette as 'background' (see above). In 16/32 bit, it can use different palette
- Beware though, if panels use different palette than background, 'palette' command (see below) won't work
- Panels are mostly used as the floor and walls of a screen. However, in pseudo travel levels where background are autoscrolling (see bgspeed below), sometimes panels aren't used at all and replaced by blank image
- If a panel is declared in autoscrolling level, it won't autoscroll. Great for platforms or vehicles!
- In default resolution, panels are normally 244 pixels high (which is 240 pixels from screen height + 4 extra pixels for quake effect) but should be 256 if the stage is set to rock up and down. It may also need to be extended depending on the 'z' values set in LEVELS.txt
- In alternate screen resolution (see video.txt above), panels are at least same with screen height + extra pixels for quake effect. For instance, in 640x480 resolution, panels height is 488
- You can use whatever width you want, but it's a good idea to use simple values like 100, 150, or 360. It makes it much easier to add up the total length of the stage.
- All panels in a stage should have the same length and height.
- If you overlap part of the image used in one panel with another, the computer will still try to draw both. Be nice to computers. Don't overlap panel layers.
- Normal mode panel layers are just plain images. They have no visual effects.
- Neon mode panel layers use 'pallete cycling': certain colors slowy change to different colors. To be more specific, colors 128 through 135 in the pallete will be cycled by two steps three times each second.
- Screen mode panel layers have alpha transparency. That means, they blend with the colors behind them, darker colors are more transparent, and brighter colors will blend less.
- You can have up to 26 panels in a stage. They are labelled by OpenBoR from a to z. This is how OpenBoR thinks of them, don't actually put those letters in the panel declaration.
frontpanel {path}
- {path} points to a panel layer which will be displayed on top of all other sprites and graphics except for the HUD. This can be used to make foregrounds.
- Just like any image used by OpenBoR, frontpanels must use paletted images. In 8 bit colourdepth (default), it must use same palette as 'background' (see above). In 16/32 bit, it can use different palette
- Beware though, if frontpanels use different palette than background, 'palette' command (see below) won't work
- frontpanels display in the order they are declared and repeat when they run out. You don't need to declare an order like with normal panels.
- frontpanel has its own scroll speed ratio which can't be changed. If you don't like it, use 'fglayer' below instead
order {panel#}{panel#}{panel#}...
order abcdefghij order klabcd order eeabcdef
- Determines the order of panels in a stage.
- {panel#} is a letter a through z which corresponds to a panel. There should not be spaces between the panel declarations (ex. order abcabcada, not order a b c a b c a d a).
- The same panel can be used more than once.
- You can have up to 1000 panels ordered, but there's a catch: the engine can't read a line with 1000 characters in it (The max is somewhere around 100). To get around this, you can place the additional panels on another line with a separate order declaration, like this:
- That '...' at the end doesn't mean you should put a ... at the end. It means the pattern repeats like it has been repeating so far.
- If you use 'direction left', panels will be displayed from left to right, starting with the last order and working up. In other words, the previous declaration would become 'eeabcdefijklabcdabcdefgh' instead of 'abcdefghijklabcdeeabcdef'.
Could you have those same panels appear according to the letter being set in order?


